Friday, October 31, 2014
ACER Iconia Tab A500 hard reset
Resetting your Acer A500 tablet

Holding Volume UP, Turn on Power, then switch Lock On/Off back and forth with Volume Up Continually held. THIS STARTS THE RESET, wait for 20 sec. to start Android.
You may have to perform a reset if your tablet fails to respond when buttons are pressed or the screen is tapped.
To reset your tablet use a small thin object (such as a paperclip) to press the recessed reset button.
Insert a small thin object (such as a paperclip) to reset power to the tablet.
ACER Iconia Tab A500 Clean boot
A clean boot will restore your tablet to the factory settings.
Warning! This will erase all your personal information, any contacts stored on your
tablet and any programs you installed.
Open Settings from the application menu, then tap Privacy > Factory data reset; click Reset tablet and then Erase everything to format your tablet.
After a certain number of wrong entries, you will be presented with an option to reset your pattern. Tap Forgot pattern? and enter your google
account username and password.
Note: You must have an active Google account on the tablet. If not working do a clean boot.
nstall an update.zip file on your Iconia A500 tablet check acer website here
1. First copy update.zip file to your FAT or FAT32 microSD card.
2. Copy Update.zip to the microSD card, but delete everything else on the card.
3. Power off your fully charged A500 tablet with the microSd card inserted.
4. Press and hold the Volume Down key then press and hold the Power key together.
5. When you see the LED turns on, release Power key but still hold Volume down key.
The Acer logo will appear on the screen and the tablet will vibrate.
Still press Volume Down key until you see "Erasing cache before SD update..." message.
The update.zip file will be automatically installed and then your tablet will reboot.
Thursday, October 30, 2014
HTC Magic Hard reset
Resetting the HTC Magic Android phoneResetting the phone deletes all data, including downloaded applications, and the phone back to its initial state, the state before you turned on the phone for the first time.
Important Make sure to back up important data you have on the phone before you perform a factory data reset.
To reset the phone
1. Press HOME > MENU, then touch Settings.
2. Scroll down the screen, then touch SD card & phone storage.
3. Navigate to the Internal phone storage section, then touch Factory data reset.
4. On the Factory data reset screen, touch Reset phone and then touch Erase everything.
( To reset the HTC Magic phone using phone buttons scroll down)


1. With the phone turned off, press and hold the HOME and BACK buttons.
2. Briefly press the END CALL/POWER button while continuing to press the HOME and BACK buttons.
3. When you see the screen with the 3 Android images, release the HOME and BACK buttons, and then press the TRACKBALL.
Tip If your phone hangs or freezes, remove the battery then wait for a few seconds, and then re-install it. After re-installing the battery, turn on the phone.
Important Make sure to back up important data you have on the phone before you perform a factory data reset.
To reset the phone
1. Press HOME > MENU, then touch Settings.
2. Scroll down the screen, then touch SD card & phone storage.
3. Navigate to the Internal phone storage section, then touch Factory data reset.
4. On the Factory data reset screen, touch Reset phone and then touch Erase everything.
( To reset the HTC Magic phone using phone buttons scroll down)
HTC Magic hard reset
Factory reset
To reset the HTC Magic phone using phone buttons1. With the phone turned off, press and hold the HOME and BACK buttons.
2. Briefly press the END CALL/POWER button while continuing to press the HOME and BACK buttons.
3. When you see the screen with the 3 Android images, release the HOME and BACK buttons, and then press the TRACKBALL.
Tip If your phone hangs or freezes, remove the battery then wait for a few seconds, and then re-install it. After re-installing the battery, turn on the phone.
Wednesday, October 29, 2014
Nokia 7510s supernova insert sim card problem solution
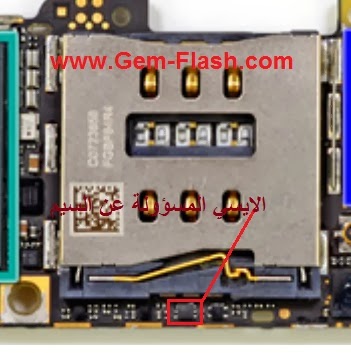
5A solution for Nokia 7210s insert sim card problem. This problem causes when the device is having a hardware damaged failure on the sim card connection circuit.
 The solution guide above shows the connection of the Sim card pin connector from the sim card holder socket to the internal solder ball bumps of an IC component which is the power IC. There are 5 connections that needs the sim card to work when inserted, these are the Vsim which the supply voltage of the sim card, the ground connection, the data signal, clock and reset. If one these five connections failed to connect to the sim card module this will result on displaying insert sim card on the LCD screen.
repair tip: ensure that the sim card connector pins are well cleaned and free from corrosion a oxidation, these oftentimes also causes the problem. check the vsim and the reset line paths continuity through to chip capacitors that where it is being connected, check also the grounding pins continuity to ground lines of the PCB board. Those are the very basic steps to check an insert sim card problem and beyond that it needs to work on the IC component (power IC) on which the line paths where connected internally of the IC components solder ball bumps.
Nokia 7510s Insert Sim card solution ( sim card ways)
repair tip: ensure that the sim card connector pins are well cleaned and free from corrosion a oxidation, these oftentimes also causes the problem. check the vsim and the reset line paths continuity through to chip capacitors that where it is being connected, check also the grounding pins continuity to ground lines of the PCB board. Those are the very basic steps to check an insert sim card problem and beyond that it needs to work on the IC component (power IC) on which the line paths where connected internally of the IC components solder ball bumps.
How to Hard Reset TMobile My Touch
Hard Reset the TMobile My Touch
(no keyboard)
Read More..
(no keyboard)
- Press and hold the HOME button and the POWER button together.
- Keep holding HOME and POWER together for at least 25 seconds, even if the "Startup" screen appears.
- Release the keys when you see a black screen with a warning sign.
- At the above warning sign screen, press the HOME and POWER buttons again simultaineously...(10 secs).. and then let them go.
- Use the trackball to scroll to wipe data/factory reset.
- Press the trackball in on wipe data/factory reset.
- When the bottom of the screen displays [DATA WIPE COMPLETED].... roll the trackball to [REBOOT SYSTEM NOW].
- Press the trackball in on [REBOOT SYSTEM NOW]
- Await for the reboot....Full factory reset completed.
Tuesday, October 28, 2014
Nokia X6 microUSB to PC connection not detected problem Solution
If having problem connecting from USB to PC on Nokia X6, this solution may help if the device is not detected after ensuring that the USB cable wire is okay. The device driver is properly installed but the problem still exists.
This solution shows the particular components might caused faulty or damaged and result to a problem connecting to the PC through USB port.
 Repair hints: Check the microUSB connector if damaged, oxidated or corroded, clean or replace it.
Check the filter coil and ESD protection chip, replace if found damaged. If the problem still persists check the power supply of the USB transceiver IC, it is conneted to the battery positive line voltage, if the voltage is okay, rework or reball the USB transceiver IC.
Read More..
This solution shows the particular components might caused faulty or damaged and result to a problem connecting to the PC through USB port.
Nokia X6 USB Not detected Solution
Check the filter coil and ESD protection chip, replace if found damaged. If the problem still persists check the power supply of the USB transceiver IC, it is conneted to the battery positive line voltage, if the voltage is okay, rework or reball the USB transceiver IC.
Monday, October 27, 2014
nokia X3 camera volume up and volume down button switch jumper ways
Heres a solution that shows nokia X3 camera, volume up and volume down button switch connection line paths, that can be used to fix and and repair a non-responsive switch.
If encountered this problem you may need to check the non-responsive button switch first if it still working or not. Then replace if already found faulty damaged. Ensure that the switch terminal solder pads on the PCB is not lifted or disconnected.
If ever the button switch is okay but still it doesnt show responding, you may then refer to the solution below for further line paths tracing procedure.
 Check the line paths of Nokia X3 Camera, Volume Up and Volume Down terminal line paths where it is being connected to certain numeric keys, in these procedure you can determine which and where certain spots you can apply a jumper wire when needed or when the button switch terminal solder pads is already lifted or damaged.
If encountered this problem you may need to check the non-responsive button switch first if it still working or not. Then replace if already found faulty damaged. Ensure that the switch terminal solder pads on the PCB is not lifted or disconnected.
If ever the button switch is okay but still it doesnt show responding, you may then refer to the solution below for further line paths tracing procedure.
Nokia X3 Camera, Volume Up and Volume Down button Switch Connection line paths
Sunday, October 26, 2014
Nokia 1280 Insert SIM card solution SIM IC jumper ways
Heres the full solution for Nokia 1280 Insert SIM card problem that it does not accept or detect any SIM card being inserted to it. This solution shows the full line paths or connection tracks of the Nokia SIM circuit, from th SIM pin connector through to the SIM filter IC and to the inner most part of the main chips solder ball bumps.
This solution also shows the SIM filter ICs solder ball bumps connection which can be used as a guide for easy line paths tracing procedures.

By replacing the SIM filter IC can only solve the insert sim card problem on nokia 1280. However, if you are having trouble in finding the replacement of this component, you may just apply a solder jumper on it exactly as the same as how it showed on the solution above.
This solution also shows the SIM filter ICs solder ball bumps connection which can be used as a guide for easy line paths tracing procedures.
Nokia 1280 Insert SIM Card Solution
Nokia 1280 SIM Filter IC Jumper Ways
By replacing the SIM filter IC can only solve the insert sim card problem on nokia 1280. However, if you are having trouble in finding the replacement of this component, you may just apply a solder jumper on it exactly as the same as how it showed on the solution above.
Friday, October 24, 2014
I Phone 5 Insert Sim Ways Repair Solution
I phone 5 insert sim ways repair solution,if u have i phone 5 and this phone not accept sim card i have this problem 100% working solution only working ic 100% working solution see this diagram and solved your phone sim card not working solution see this I Phone 5 Home Button Not Working Ways Solution
many time working solution tested by me see and try now i hope solved your phone sim card solution .
Thursday, October 23, 2014
Blackberry 9900 cellular phone keypad repair solution
blackberry 9900 cellular phone keypad repair solution if u have this model phone blackberry and this phone problem keypad not working full hang any key not working i have this problem 100% working solution see my solution guide i think solved your phone keypad problem
Blackberry 9900 ear speaker not working line damage ways solution
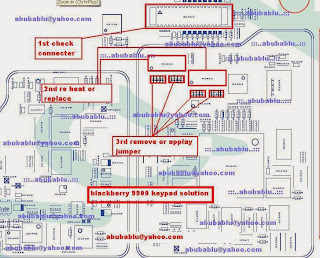
see all red mark and try this step by step many time working me this step and i hope solved your phone blackberry 990 keypad problem all solve i think u try this i working now your phone
and dont forget visit my blog.
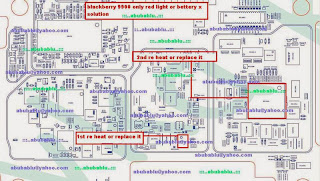
Blackberry 9900 only red light battery solution
Blackberry 9900 only red light battery solution if u have this blackberry model put in set battary but set not on only red light and again off your phone i have manual and final solution this problem see my solution and try step by step
1st try this full set firmware update i hope solved your phone blackberry red light solution but not solve see 2nd try this solution
Blackberry 9900 cellular phone mic repair solution
see this diagram and try my solution step by step i think solved your phone 100% see red mark all guide and try to 1st and 2nd step 100% working this solution tested many time me this solution and dont forget visit my blog .
Blackberry 9000 cellular mobile repairing connect charger or usb display goes Solution
blackberry 9000 cellular mobile repairing connect charger or usb display goes solution,blackberry 9000 usb not connected solution ,blackberry usb not working solution ,blackberry usb not recognize solution ,blackberry usb line not working solution ,blackberry 9000 usb jumper ways repairing solution many this blackberry cellular phone usb clear but not working no connect changer solution i have this problem 100% tested solution if u have this problem i give 100% tested solution see my solution many time tested this solution see this solution i hope solve your problem,blackberry 8800 usb Line Ways Solution

see my solution yellow link 1st reheat this but not solved try to change i think 100% working your usd and charging solution.
Saturday, October 18, 2014
Nokia Asha 311 Power Button On Off Switch Not Working Problem
if you have a Nokia Asha 311 dead they may can have a power switch on off problem so please in first step plug in a charger and if Nokia Asha 311 is charging proper and well but not getting on it means the main problem can be power switch on off fault.Nokia Asha 311 WiFi Not working Problem Solution Ways see All cellular mobile repair solution

so for this you have to change power switch button on off button in Nokia Asha 311 if prints are also damge in Nokia Asha 311 for on off button then here is a full path and track for power switch button in diagram that is attached with this post so check all this path and track for power switch on off button in Nokia Asha 311 and if any of these links broken than make these jumpers as shown in diagram with red line while blue color is indicated for ground print.
for more detail and new tips and tricks about this problem keep visiting this page we will update it timely with new diagrams.some related post are also given bellow you can read them also for more information.
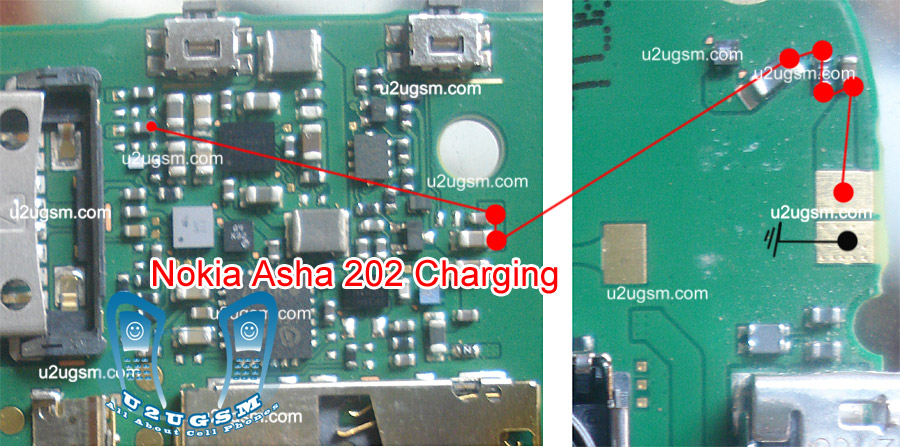
Nokia Asha 202 Not charging problem solution jumpers
When you plugin charging pin into Nokia Asha 202 charging jack. And it show notification not charging it can be fault of missing or non proper values of components. If there is nothing any notification then it can be fault of damage charging pin or damage parts.
nokia C5-03 Mic problem solution jumper ways

In above diagram you can see red line that is used for charging tracks. Once you find out these parts. Clean mother board with electronic cleaner and apply hot air to make it dry. Much heat can damage the mother board and it can be harm for your skin also.
Check all these tracks and if any of them is missing apply jumpers as given in diagram to repair Nokia Asha 202 charging problem.
for more detail and new tips and tricks about cellphone service problem keep visiting this page we will update cellphone service diagrams timely with new cellphone diagrams.some related post are also given bellow you can read them also for more information about cellphone.
Read More..
nokia C5-03 Mic problem solution jumper ways
In above diagram you can see red line that is used for charging tracks. Once you find out these parts. Clean mother board with electronic cleaner and apply hot air to make it dry. Much heat can damage the mother board and it can be harm for your skin also.
Check all these tracks and if any of them is missing apply jumpers as given in diagram to repair Nokia Asha 202 charging problem.
for more detail and new tips and tricks about cellphone service problem keep visiting this page we will update cellphone service diagrams timely with new cellphone diagrams.some related post are also given bellow you can read them also for more information about cellphone.
Friday, October 17, 2014
How to Factory Reset Sony Xperia Z2
 We have our own reasons why we factory reset our device. Maybe we want to delete all the files and restore the device to its original state. It could also be the device may be malfunctioning or so slow and it needs to be reset.
Restoring the default settings or factory reset your Sony Xperia Z2 will delete all your files. It is recommended to backup your important files on your computer before attempting to reset your device.
There are two ways on how to reset your Sony Xperia Z2. One is to erase everything, wiping your files and restoring the default settings. The other one is to reset the device without deleting your personal data.
How To Reset Your Sony Xperia Z2 (Erasing All Your Files):
- On your Home Lcd, tap Apps icon.
- Go to Settings, and select Backup & reset.
- Tap on Factory data reset.
- Then Reset phone.
- Confirm by tapping Erase everything. You just need to wait while your phone deleting your files and restoring your settings to default.
How To Reset Without Erasing Your Personal Data:
- On your Home Lcd, tap Apps icon.
- Go to Settings, and select Backup & reset.
- Tap on Settings reset.
- Then Reset phone.
- Confirm by tapping Reset settings.
- Wait while your phone restoring your settings.
Nokia 6125 Insert Sim Not Working
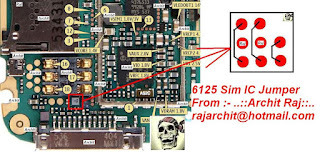
Nokia 6125 Insert Sim Card,
Nokia 6125 Sim Ic Ways,
Nokia 6125 Sim Card Not Working,
Nokia 6125 Sim ic jumper
Thursday, October 16, 2014
nokia c1 02 light problem solution jumpers
Light not working in Nokia C102 can be solve with this diagram that is given bellow. In this post you can find some parts that are used in Light function in Nokia C1-02.Nokia C5-03 Mic problem solution jumper ways

All these parts are in lined with red color in first step remove parts that are given in nokia c1-02 light problem solution diagram above.And then short lcd point 3 and 4 as given in diagram above to repair light problem in nokia c1-02 with jumpers.
Apply second jumper from capestor to the three leg ic’s print. Where as it is given in diagram above to repair light solution jumpers.
Check Lights in some cases light led are not fixed proper. So re sold led lights and it will work ok.
Wednesday, October 15, 2014
Dual Sim IC Repair Dual Sim IC Ways and Jumper 04

Dual Sim IC Repair Dual Sim IC Ways and Jumper 04

Tuesday, October 14, 2014
all security test failed 100 solution!
Many people posted in this forum about security test failed !
we know that
when come security test failed
solution
1. super sd auth or pmm auth than write good or modified pm ( must need pm 1 & 309)
or, 2. sd repair super sd auth or pmm auth than write good or modified pm ( must need pm 1 & 309)
yes! we have this solution
1. first backup rpl ( go > imei and security tab > imei rebuild > backup rpl)
2. erase old pm ( go > pm tab > erase )
3. Reset npc data ( go> imei and security tab> reset NPC data)( must backup rpl before do this)
4. Erase pm again (go > pm tab > erase )
5.Write rpl from backup ( go > imei and security tab > imei rebuild > restore imei)
6. go pm tab > super sd auth or pmm auth > than write good or modified pm ( must need pm 1 & 309)
7. erase pm again
8. Recover CERT ( go>imei and security tab> imei rebuild > recover cert)
9. give full factory reset
Read More..
we know that
when come security test failed
solution
1. super sd auth or pmm auth than write good or modified pm ( must need pm 1 & 309)
or, 2. sd repair super sd auth or pmm auth than write good or modified pm ( must need pm 1 & 309)
yes! we have this solution
1. first backup rpl ( go > imei and security tab > imei rebuild > backup rpl)
2. erase old pm ( go > pm tab > erase )
3. Reset npc data ( go> imei and security tab> reset NPC data)( must backup rpl before do this)
4. Erase pm again (go > pm tab > erase )
5.Write rpl from backup ( go > imei and security tab > imei rebuild > restore imei)
6. go pm tab > super sd auth or pmm auth > than write good or modified pm ( must need pm 1 & 309)
7. erase pm again
8. Recover CERT ( go>imei and security tab> imei rebuild > recover cert)
9. give full factory reset
Monday, October 13, 2014
nokia 101 light problem solution
If you have nokia 101 light problem and want to solve it you can solve the problem by following a few steps that are given in bellow diagram. For Nokia 101 light problem solution dis assambly the mobile phone and find out if there is some carbon.nokia 101 insert sim solution

If you find out water damages in it apply electronics cleaner and make it clean. With hot air make it dry and keep in mind do not apply much heat it can harm your skin and may can damage the mother board.
In diagram you can see three simple steps in first step remove parts and in second apply jumpers as given in it. Third parts is also about the jumper.
these jumpers will solve nokia 101 light problem.
Wednesday, October 1, 2014
Subscribe to:
Posts (Atom)