
Below are some of the features of the carbon:
Showing posts with label rom. Show all posts
Showing posts with label rom. Show all posts
Monday, September 1, 2014
Samsung Clone Galaxy S4 i9500 MT6572 Tested Rom Here
Samsung Clone Galaxy S4(i9500) MT6572 Tested Rom Here

Firmware Details:
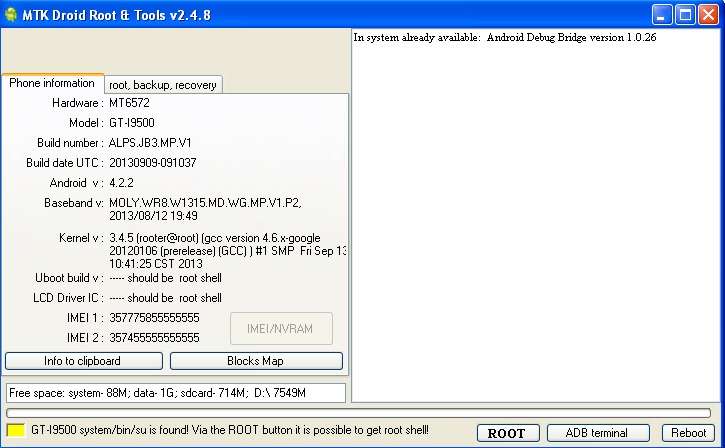
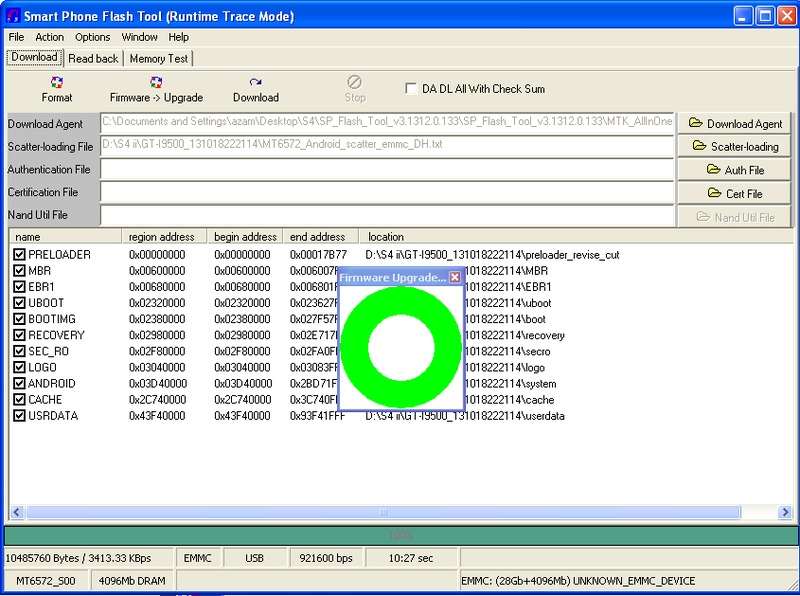
Successfully Flashed & Recovered
Read More..
Firmware Details:
Successfully Flashed & Recovered
Rom From Here
Flash Tool From Here
Flash Tool From Here
Thursday, August 14, 2014
How To Android 4 3 Jelly Bean Carbon ROM For AT T HTC One
Now you can download and install Android 4.3 Jelly Bean Carbon custom firmware based on the AT & T HTC . Carbon team of developers recently introduced Carbon latest build of Android 4.3 Jelly Bean enabled on AT & T HTC . This Android 4.3 Jelly Bean ROM Carbon build using CM10.2 source but comes with a variety of additional features. Some of the key features of Carbon ROM , can be customized hardware and software keys , transparent navbar and the status bar , menu and power adjustable Theme engine . We conclude the installation tutorial details of Android 4.3 Jelly Bean Carbon -based custom ROM on the AT & T HTC below .
Some of the coolest Android 4.3 Jelly Bean features youll enjoy are license manager , virtual surround sound , a dial pad improves both the Linux kernel , can create a Bluetooth pairing with low -power devices , controls unlimited user accounts with profile , which features cutting do not allow your phone to slow as time passes and more .
- Android 4.3
- PIE
- Halo
- AOKP Ribbons
- Comprehensive speed enhancements and processor-specific optimizations
- Option to hide lockscreen hints
- Carousel lockscreen
- Customizable lockscreen buttons and sliders
- Customizable hardware and software keys
- Transparent navbar and status bar
- Customizable navbar ring
- Navbar arrow keys
- Navigation bar widgets
- Customizable power menu
- Notification power widget
- Notification brightness adjustment
- Customizable quicksettings panel
- Statusbar mods including center clock and color
- LCD Density
- Theme engine
- Quiet hours
- Volume rocker music controls
- Full Rotation
- Customizable battery and notification light
- More that havent even been mentioned, and more to come!

Pre Requisites:
1. Backup your device data.
2. Make sure your device have at least 60% battery power. You can install an app like Battery Notifier BT Free on your Android device to check it easily.
3. You already have USB Driver Installed for AT&T HTC One in your PC. Download USB Drivers
4. Make sure USB Debugging is enabled otherwise you won’t able to transfer file between PC and AT&T HTC One.
5. Your device have ClockworkMod Recovery Installed.
6. Your device is already rooted.
If you done everything that we mentioned above then you are ready to follow step-by-step guide on how to install Android 4.3 Jelly Bean based Carbon ROM on AT&T HTC One.
File Required(Download by clicking on it)
- Carbon Android 4.3 Jelly Bean ROM For AT&T HTC One [Filename: CARBON-JB-NIGHTLY-20131017-0654-m7att.zip]
- Google Apps [Filename: gapps-jb-20130813-signed.zip]
Warning!
This tutorial is only for AT & T HTC. Do not try this guide on any other Android device. Moreover, we are not responsible for damages caused due to the instructions given in this page. Try this at your own risk. However, it is highly unlikely that your device will be damaged if you follow all the instructions as mentioned in the procedure. :D
How to Install Android 4.3 Jelly Bean based Carbon ROM on AT&T HTC One
- Connect your device to PC using USB cable and then copy downloaded files to the SD card of your device.Important: Don’t extract any files.
- Disconnect USB and then turn off your AT&T HTC One.
- Now, boot into recovery mode. To do so, press and hold Volume Down and Power button together to boot into HBOOT menu, from there select Recovery use volume buttons to scroll and Power button to select.
- Perform a Nandroid backup of your existing ROM that you can restore later if this new ROM not work or you want to go back into your previous ROM. To perform a backup, select Backup and Restore, then on the next screen, select Backup again. Go back to main recovery menu after backup is complete.
- Now, perform data wiping task. To do so, select wipe data/factory reset, then select Yes on next screen to confirm your action. Wait few minutes till the data wipe is complete. Now come back to CWM recovery main menu. Select wipe cache partition and after wiping process done, select Wipe Dalvik Cache under advanceoption to perform Dalvik cache wiping.
- Select install zip from sdcard, then select choose zip from sdcard. Now, locate the Carbon ROM Zip file that you copied earlier in Step 1 and select it by pressing Power button. Confirm installation by selecting Yes – Install __.zip on the next screen. The ROM installation will begin.
- Once the ROM installation process end, repeat the step 6 but choose the gapps-jb-20130813-signed.zip file instead of ROM zip to install the Google apps package.
- When installation is completed, go back to the main recovery menu and select reboot system now to reboot your AT&T HTC One and boot up into customized Android 4.3 Jelly Bean ROM Carbon. The first boot will take time, so be patient!
- Returning to Previous ROM: To go back to your previous ROM, boot into recovery, select backup and restore then restore your previous ROM by selecting it from the list.
Congrats! Android 4.3 Jelly Bean firmware based custom ROM Carbon is now installed and running on your AT&T HTC One.
Tuesday, August 12, 2014
How to root Samsung Galaxy S5 SM G900A Android 4 4 Kitkat Rom Using Root Tool by Towelroot
Android 4.4.x version various root ways most useful root way is Towel root. This tr.ap software can make root any of android 4.4.x kitkat version, While various root tools are failed to root Samsung Galaxy S III AT&T SGH-I747, Samsung Galaxy S5 SM-G900A.
To install and root by Towelroot:
Read More..
To install and root by Towelroot:
- Download: tr.apk
- Install tr.apk one desire device which you wanna root.
- Open towelroot from you device menu.
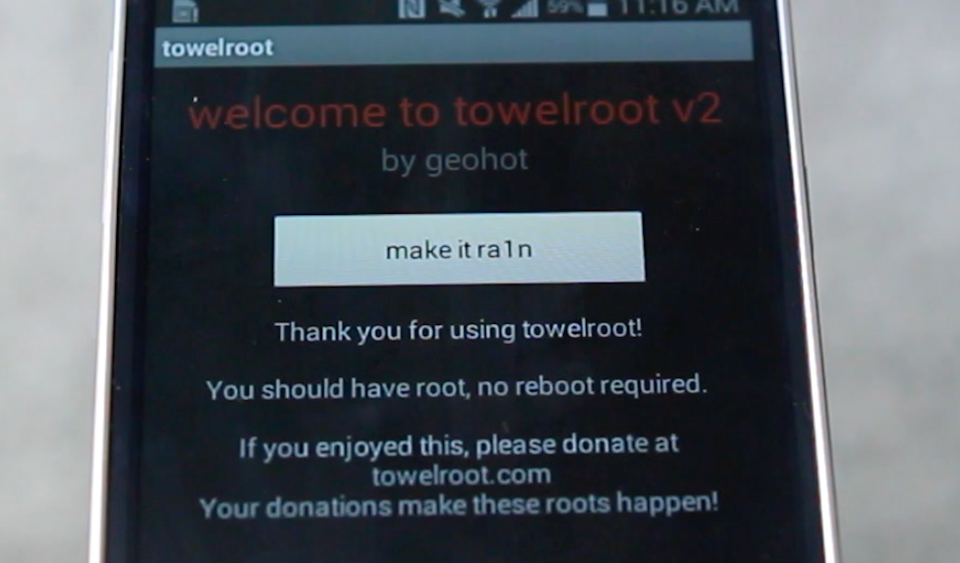
- Click on Make it ra1n like given below, after wait a few sec to confirm gain root access.
Sunday, August 10, 2014
How to install a Custom ROM
How to install a Custom ROM
The main feature which distinguishes Android from all other operating system is the ability to tweak and customize the OS as per your liking.
If you are good at Linux commands and Java you can do this yourselves or you can install a Custom ROM prepared by other developers.
Before I start this, I would like to elaborate on what a Custom ROM or a ROM means. ROM in computer terms is Read Only Memory. It is specifically designed to be only accessible for reading and is not accessible to users for modifications. But in Android you can get access to this partition and make any changes you want to make.
For all practical purposes, a ROM is your Operating System or OS.
Now that it is out of the way, lets start.
Requirements:
For installing any custom ROM you will need to root your phone and have ClockworkMod (CWM) recovery installed.
A recovery is a partition on your internal memory which is used to install Software Upgrades or act as a last line of defense against a bricked device.
For Rooting and Installing CWM you will have to follow the procedures mentioned here. Once you have that you can come back here.
How to:
Okay now that you have CWM recovery and root.
Go here and search for a Custom ROM you like. Keep in mind that read the first post of the thread very carefully. It will have all the features of that ROM in detail. Download the ROM from that thread.
Once you have downloaded the ROM, follow these steps:
3. You are now ready to Flash your Custom Rom
Voila, You ROM will be installed, now Reboot.
Your Custom ROM is ready to be used.
Enjoy the Android Goodness!!
The main feature which distinguishes Android from all other operating system is the ability to tweak and customize the OS as per your liking.
If you are good at Linux commands and Java you can do this yourselves or you can install a Custom ROM prepared by other developers.
Before I start this, I would like to elaborate on what a Custom ROM or a ROM means. ROM in computer terms is Read Only Memory. It is specifically designed to be only accessible for reading and is not accessible to users for modifications. But in Android you can get access to this partition and make any changes you want to make.
For all practical purposes, a ROM is your Operating System or OS.
Now that it is out of the way, lets start.
Requirements:
For installing any custom ROM you will need to root your phone and have ClockworkMod (CWM) recovery installed.
A recovery is a partition on your internal memory which is used to install Software Upgrades or act as a last line of defense against a bricked device.
For Rooting and Installing CWM you will have to follow the procedures mentioned here. Once you have that you can come back here.
How to:
Okay now that you have CWM recovery and root.
Go here and search for a Custom ROM you like. Keep in mind that read the first post of the thread very carefully. It will have all the features of that ROM in detail. Download the ROM from that thread.
Once you have downloaded the ROM, follow these steps:
- Put the ROM in the root directory of your Internal/External SDcard
- Reboot into recovery: Press and Hold Power+Home+Volume Up buttons together and release it only when you see the recovery menu come up.
- Now, Choose Wipe data.Factory Reset from here
- Then, Wipe Cache
- and, goto Advanced and choose Wipe Dalvik Cache
3. You are now ready to Flash your Custom Rom
- Choose, Install From Sdcard option in the Main Menu of the Recovery
- Choose the ROM which you had earlier put on your SDcard
- It will ask you whether you want to install or not, navigate to "Yes" and choose it.
Voila, You ROM will be installed, now Reboot.
Your Custom ROM is ready to be used.
Enjoy the Android Goodness!!
Subscribe to:
Posts (Atom)