Showing posts with label guide. Show all posts

Wednesday, September 24, 2014

How to Update Samsung Galaxy Fame S6810 With Android 4 1 2 XXAMJ1 Jelly Bean Official Firmware Install Odin Guide


Samsung Galaxy Fame with model number GT-S6810 has already received the latest Android 4.1.2 Jelly Bean update with firmware build number S6810XXAMJ1. The new official firmware is currently available as an Over-The-Air (OTA) update as well as through Samsung KIES.
Firmware details
PDA: S6810XXAMJ1
CSC: S6810OLBANB1
MODEM: S6810DXAMG1
Version: Android 4.1.2
Build date: Oct 1, 2013
Regions: Indonesia, Vietnam
Samsung Galaxy Fame S6810 users who missed the OTA update notification or unable to access the update over Samsung KIES, can now download and install the same manually using our step-by-step guide.
Pre-requisites
1. Install USB Drivers for Samsung Galaxy Fame on the computer.
2. Enable USB Debugging Mode on the phone by navigating to Settings >> Developer Options.
3. Make a backup of all your important data before following the guide.
4. The Galaxy Fame should be factory unlocked and not locked to any particular carrier.
5. Ensure the battery of the phone is charged more than 80 percent.
6. The Android 4.1.2 XXAMJ1 Jelly Bean firmware is compatible only with Samsung Galaxy Fame (GT-S6810L). Applying this to any incorrect variant might brick the device. Verify the model number of the Galaxy Fame by navigating to Settings >> About Phone.

Files Required
1. Android 4.1.2 XXAMJ1 Jelly Bean Firmware for Galaxy Fame S6810
2. Odin 3.07
Related Article:How to Update Galaxy Fame S6810L with Android 4.1.2 UBANA1 Jelly Bean Official Firmware
Steps to Update Galaxy Fame S6810 with Android 4.1.2 XXAMJ1 Jelly Bean Firmware
Step 1: Extract Firmware zip file using WinRAR/7-Zip/WinZip or any other extracting tool, you will get a .tar.md5 file and some other files (optional).
Step 2: Extract Odin zip file and you will get Odin3 v3.07.exe along with few other files.
Step 3: Switch off the Galaxy Fame.
Step 4: Boot the device into Download Mode by pressing and holding Volume Down, Home and Power buttons together until a construction Android robot icon with a warning triangle appears on Lcd. Now press the Volume Up button to enter Download Mode.
Step 5: Run Odin on the computer as an Administrator.
Step 6: Connect the Galaxy Fame to the computer using USB cable while it is in the Download Mode. Wait until Odin detects the device. When the device is connected successfully, the ID: COM box will turn to light blue with the COM port number. Additionally, the successful connected will be indicated by a message saying Added.

Step 7: Select the following files in Odin from extracted S6810XXAMJ1 firmware folder:
  • Click the PDA button and select the .tar.md5 file.
  • Click the Phone button and select file with MODEM in its name. Ignore if there is no such file.
  • Click the CSC button and select file with CSC in its name. Ignore if there is no such file.
  • Click the PIT button and select the .pit file. Ignore if there is no such file.
Step 8: In Odin, enable Auto Reboot and F. Reset Time checkboxes. Also, ensure the Re-Partition checkbox is chosen only if a .pit file was chosen in the previous step.
Step 9: Verify everything suggested in Step 7 and Step 8 is done correctly. Then hit the Start button to begin the installation process.
Step 10: Once the installation process completes, your phone will restart and soon you will see a PASS message with green background in the left-most box at the very top of the Odin. You can now unplug the USB cable to disconnect it from the computer.

Samsung Galaxy Fame S6810 should be now updated with Android 4.1.2 XXAMJ1 Jelly Bean official firmware. Head over to Settings >> About Phone to verify the software version running on the device.

Note: If Galaxy Fame S6810 stuck at booting animation after Step 10 then go to recovery mode (press and hold the Volume Up, Home and Power buttons together) and perform Wipe data/Factory Reset and Wipe Cache Partition task before selecting reboot system now function. In recovery mode use Volume keys to navigate between options and Power key to select the option. Please note, performing wiping task will erase your device internal memory data and not external SD card data.

Read also: How to Root Galaxy Fame S6810 on Android 4.1.2 Jelly Bean Firmware
Read More..

Sunday, August 31, 2014

Samsung Galaxy Ace 3 LTE S7275R with Android 4 2 2 XXUANA3 Jelly Bean Official Firmware How To Guide


Android
Samsung Galaxy Ace 3 with LTE connectivity has just received the latest Android 4.2.2 Jelly Bean update with firmware build number S7275RXXUANA3. The new official firmware is now available as an Over-The-Air (OTA) update as well as through Samsung KIES.
Firmware details
PDA: S7275RXXUANA3
CSC: S7275ROLBANA1
MODEM: S7275RXXUAML1
Version: Android 4.2.2
Build date: Jan 13, 2014
Regions: Singapore, Malaysia
Samsung Galaxy Ace 3 (LTE) S7275R users who missed the OTA update notification or unable to access the update over Samsung KIES, can now download and install the same manually using our step-by-step guide.
Pre-requisites
1. Install USB Drivers for Samsung Galaxy Ace 3 on the computer.
2. Enable USB Debugging Mode on the phone by navigating to Settings >> Developer Options.
3. Make a backup of all your important data before following the guide.
4. The Galaxy Ace 3 should be factory unlocked and not locked to any particular carrier.
5. Ensure the battery of the phone is charged more than 80 percent.
6. The Android 4.2.2 XXUANA3 Jelly Bean firmware is compatible only with the LTE version of Samsung Galaxy Ace 3 (GT-S7275R). Applying this to any incorrect variant might brick the device. Verify the model number of the Galaxy Ace 3 by navigating to Settings >> About Phone.

Files Required
1. Android 4.2.2 XXUANA3 Jelly Bean Firmware (Mirror Link) for Galaxy Ace 3 (LTE) S7275R
2. Odin 3.07 (Mirror Link)

Steps to Update Galaxy Ace 3 (LTE) S7275R with Android 4.2.2 XXUANA3 Jelly Bean Firmware
Step 1: Extract Firmware zip file using WinRAR/7-Zip/WinZip or any other extracting tool, you will get a .tar.md5 file and some other files (optional).
Step 2: Extract Odin zip file and you will get Odin3 v3.07.exe along with few other files.
Step 3: Switch off the Galaxy Ace 3.
Step 4: Boot the device into Download Mode by pressing and holding Volume Down, Home and Power buttons together until a construction Android robot icon with a warning triangle appears on screen. Now press the Volume Up button to enter Download Mode.
Step 5: Run Odin on the computer as an Administrator.
Step 6: Connect the Galaxy Ace 3 to the computer using USB cable while it is in the Download Mode. Wait until Odin detects the device. When the device is connected successfully, the ID: COM box will turn to light blue with the COM port number. Additionally, the successful connected will be indicated by a message saying Added.

Note: If the Added message does not appear, then try re-install USB drivers or changing the port on the computer.

Step 7: Select the following files in Odin from extracted S7275RXXUANA3 firmware folder:
  • Click the PDA button and select the .tar.md5 file.
  • Click the Phone button and select file with MODEM in its name. Ignore if there is no such file.
  • Click the CSC button and select file with CSC in its name. Ignore if there is no such file.
  • Click the PIT button and select the .pit file. Ignore if there is no such file.
Step 8: In Odin, enable Auto Reboot and F. Reset Time checkboxes. Also, ensure the Re-Partition checkbox is chosen only if a .pit file was chosen in the previous step.
Step 9: Verify everything suggested in Step 7 and Step 8 is done correctly. Then hit the Start button to begin the installation process.
Step 10: Once the installation process completes, your phone will restart and soon you will see a PASS message with green background in the left-most box at the very top of the Odin. You can now unplug the USB cable to disconnect your device from the computer.

Samsung Galaxy Ace 3 (LTE) S7275R should be now updated with Android 4.2.2 XXUANA3 Jelly Bean official firmware. Head over to Settings >> About Phone to verify the software version running on the device.

Note: If Galaxy Ace 3 (LTE) S7275R stuck at booting animation after Step 10 then go to recovery mode (press and hold the Volume Up, Home and Power buttons together) and perform Wipe data/Factory Reset and Wipe Cache Partition task before selecting reboot system now function. In recovery mode use Volume keys to navigate between options and Power key to select the option. Please note, performing wiping task will erase your device internal memory data and not external SD card data.
Read More..

Saturday, August 23, 2014

How To Guide Install XXUEMKA Android 4 3 JB Firmware on Galaxy Note 2 N7100

Samsung launches Android 4.3 Jelly Bean XXUEMKA official firmware update for the Galaxy Note GT - N7100 2 . The firmware update is launched in various countries including Pakistan , Morocco , United Arab Emirates , Nigeria , Taiwan , Tunisia , Iraq , Afghanistan , Libya and South Africa , and also can be downloaded for manual updates . You can also update your device firmware via Kies or OTA update . Because of this smart phone is equipped with Android 4.1.2 Jelly Bean out of the box , this new firmware update will improve your smartphone to a better OS is Android 4.3 Jelly Bean . Continue reading this guide to find out how to get an official stock Android 4.3 Jelly Bean N7100XXUEMKA firmware running on Galaxy Note GT - N7100 2 . Almost all the possible ways to update your device firmware to this discussion here . One thing should be noted that the official firmware flashing or install kernel then restore root access you will fail , in short it will unroot it .

Android 4.3 Jelly Bean N7100XXUEMKA stock firmware available in both OTA and Kies update. However, if you can not get it from there then you can always blink N7100XXUEMKA Android 4.3 Jelly Bean firmware on Galaxy Note GT-N7100 manual 2. We will discuss all the ways available updates. You should always try OTA or Kies method first and when the second method does not work then just try flashing manually.

Warning: This tutorial is only for Galaxy Note 2 GT-N7100. Don’t try this guide on any other Android device. Also, we are not responsible for any damage caused due to the instruction given in this page. Try this at your own risk. However, it is very unlikely that your device will be damaged if you follow all the instructions as it is which are mentioned in procedure.

Pre Requisites:

Though official firmware restore all existing data but we recommend to back up your data first before proceeding to avoid any uncomfortable situation such as bootloop fix.

1. Backup your device data.

2. Make sure your device have at least 60% battery power. You can install an app like Battery Notifier BT Free on your Android device to check it easily.

3. You already have USB Driver Installed for Galaxy Note 2 GT-N7100 in your PC.Download USB Drivers

4. Make sure USB Debugging is enabled otherwise you won’t able to transfer file between PC and Galaxy Note 2 GT-N7100.

  • How To Update Galaxy Note 2 GT-N7100 via OTA
  • First of all make sure you have stable internet connection (Wi-Fi or data network) on your device.
  • Now, go to Android app drawer and then select Settings.
  • Then locate About Device and tap on it.
  • Next select Software update from About device screen.
  • Then tap on Update option.
  • You should see an update, press OK to download and install. (Remember, download using 3G or network data will incur additional charges to your phone bill!)
  • Soon your device will reboot to complete the installation process.

If you see “The latest update have already been installed” massage while checking update then your device yet to receive an OTA update. Check back within few days or jump to next procedure.
How To Update Galaxy Note 2 GT-N7100 via Kies

  1. Make sure you have stable internet connection on your computer.
  2. Now download and install Samsung Kies on your computer.
  3. Turn on your device (if it off) and then connect it to computer with USB cable.
  4. Run Samsung Kies and wait for it to detect your device.
  5. You should see a New Firmware Upgrade is available at Samsung Kies home screen.
  6. Press the Firmware Upgrade button to proceed.
  7. Follow on screen instruction and soon you will see your device running upgrade and reboot automatically. Once done, you can disconnect your device from computer.


Again! If you see “This is the latest firmware” in Samsung Kies, then your device yet to receive the latest update on Kies. Its good time to go for manual update instruction that located below.


[Note: You can install any firmware listed below despite availability in other countries, except those which comes with carrier name.]
N7100XXUEMKA Android 4.3 Jelly Bean Firmware Downloads


United Arab Emirates: N7100XXUEMKA_N7100OJVEMK3_LYS.zip


[Please Note: After flashing this firmware you will lost any installed custom ROM including CM10.2, AOKP, Avatar,Beanstalk, Omni ROM, Slim ROM, Pac-Man, Paranoid Android, LiquidSmooth or Carbon.

How To Install N7100XXUEMKA Android 4.3 Jelly Bean On Galaxy Note 2 GT-N7100 Manually

  1. Download Odin v3.09.
  2. Extract Firmware zip file that you downloaded earlier from above link, you will get a .tar.md5 file and some other files (optional).
  3. Extract Odin zip file and you will get Odin3 v3.09.exe along with few other files.
  4. Power off your Android device. Wait 5-6 seconds for vibration to confirm complete switch off.
  5. Now, put the Galaxy Note 2 GT-N7100 in Download Mode by pressing and holding down the Home &Volume Down button together while pressing the Power button. A warning screen will come up; press Volume Up button to enter Download Mode.
  6. Now run Odin3 v3.09.exe (see Step 3) as an Administrator because Admin privileges is required to complete the process smoothly (only applicable Windows Vista and higher).
  7. Now connect your device to your PC using USB cable. An “Added!!” massage will appear in Odin’s message box. If you don’t get the same then you should try another USB port (try USB port located in back in your desktop PC). If that too don’t work then you should reinstall the driver. If you successfully see the “Added!!” message in Odin then you are ready to go in next step. You should also see COM port with a number in Yellow if you successfully added your device.
  8. Click the AP Button, and select that .tar.md5 file that you get in Step 2.
  9. In Odin window, make sure only Auto Reboot and F. Reset Time checkboxes are selected.
  10. Double check everything that we mentioned in Step 8 & Step 9 above. Now, once satisfied hit the START button to begin the flashing process.
  11. Once flashing completed, your Galaxy Note 2 GT-N7100 will restart and soon you will see a PASS message with green background in the left-most box at the very top of the Odin. You can now unplug the USB cable to disconnect your device from computer.


Congrats! You just updated your Galaxy Note 2 GT-N7100 to Android 4.3 Jelly Bean firmware. Go to Settings > About device to verify this firmware update.
Fix Boot Loop Issue On Galaxy Note 2 GT-N7100

If Galaxy Note 2 GT-N7100 stuck at booting animation for more than 10 minutes after Step 11 then follow below instructions:
Go to recovery mode. To do so, press and hold the Volume Up, Home and Power buttons together.
Now perform Wipe data/Factory Reset and Wipe Cache Partition task before selecting reboot system now function. In recovery mode use Volume keys to navigate between options and Power key to select the option.
Please note, performing wiping task will erase your device internal memory data and not external SD card data.

That’s it! Let us know about your latest Android 4.3 Jelly Bean experience.
Read More..

Friday, August 22, 2014

China MTK Android Format Done With New SP Flash Tool v5 1343 1 How To Guide

China MTK Android Format Done With SP Flash Tool v5.1343.1 Done 100% Tested By Me
v5.1234.00
New Feature:

[MT6252,MT6250] Provide the download function if the load setting is 128Kb virtual block.
Bug Fix:
[SV3 chips] Fix the bug about closing COM port delayed caused from abnormal protocol between PC side and target side
[MT6250] Provide the OTP function for dual serial flash platform, but tool only support to write the OTP region on the first flash.
[SV3 NOR Platform] Fix the partial download tool checking rule. User may encounter download fail if you only choose ROM file to download.
[MT6276] Fix Restore fail in the Backup/Download/Restore flow via UART cable

Download: MTK FlashTool v5.1232.00
World last Format Done
Read More..

Thursday, August 21, 2014

Samsung Galaxy Star Pro S7262 Android 4 1 2 XXUAMK5 Jelly Bean Official Firmware How to Update Guide

Samsung Galaxy Star Pro with model number GT-S7262 has already received the Android 4.1.2 XXUAMK5 Jelly Bean update. The new official firmware is now available as an Over-The-Air (OTA) update as well as through Samsung KIES.

Samsung Galaxy Star Pro S7262 users who have already installed their devices with Android 4.1.2 Jelly Bean, may root their devices using the tutorial below.

Disclaimer: Rooting voids the warranty of your device. We and the developer of this rooting procedures shall not be held responsible if any undesirable outcomes may happen to your device. use of this root guide is solely at your own risk!
Pre-Requisites
1. Install USB Drivers for Samsung Galaxy Star Pro on your computer.
2. Enable USB Debugging Mode on the device by navigating to Settings >> Developer Options.
3. Make a backup of all your important data before following the guide.
4. The Galaxy Star Pro should be factory unlocked and not locked to any particular carrier.
5. Ensure the battery of the device is charged more than 80 percent.
6. The ClockworkMod Recovery (CWM) file works only on the Samsung Galaxy Star Pro (GT-S7262). Applying these on any incorrect variant might brick the device. Verify the model number of the Galaxy Star Pro by selecting Settings >> About Phone.
Files Required
1. CWM (Mirror Link)
2. Superuser (Mirror Link) or SuperSU
3. Odin 3.07 (Mirror Link)

Steps to Install CWM Recovery on Samsung Galaxy Star Pro S7262
Step 1: Extract the CWM Recovery and Odin 3.07 files using WinRAR/7-Zip/WinZip or any other extracting tool.
Step 2: Copy the Superuser .zip file to the SD card of your phone.
Step 3: Switch off the Galaxy Star Pro. Then boot the device into Download Mode by pressing and holding Volume Down, Home and Power buttons together until a construction Android robot icon with a warning triangle appears on screen. Now press the Volume Up button to enter Download Mode.
Step 4: Run Odin on the computer as an Administrator.
Step 5: Connect the Galaxy Star Pro to the computer using USB cable while it is in the Download Mode. Wait until Odin detects the device. When the device is connected successfully, the ID: COM box will turn to light blue with the COM port number. Additionally, the successful connected will be indicated by a message saying Added.

Note: If the Added message does not appear, then try re-install USB drivers or changing the port on the computer.

Step 6: In Odin, click the PDA button and select the recovery.tar.md5 file. Verify that Auto Reboot and Re-Partition options are NOT selected.
Step 7: Double-check and click Start button in Odin. The installation process will now begin.
Step 8: Once the installation process completes, you will see a PASS message with green background in the left-most box at the very top of the Odin. You can now unplug the USB cable to disconnect it from the computer.

Steps to Root Galaxy Star Pro S7262 by Installing SuperSU via CWM Recovery
Step 9: Reboot the device into CWM Recovery by pressing and holding Volume Up, Home and Power buttons together.
Step 10: In CWM Recovery, select "install zip from sdcard" and then select "choose zip from sdcard". Now, navigate to the Superuser .zip file that you copied earlier and confirm the installation by selecting Yes.
Step 11: Once installation process is completed, return to main recovery menu and select "reboot system now".

Samsung Galaxy Star Pro S7262 running on Android 4.2.2 Jelly Bean is now rooted successfully. You can now install any app that requires root permission. Verify the root status of the device by downloading Root Checker app from Google Play Store.

Thanks to all fellas at XDA who first tried out this rooting technique. This root method was originally posted via XDA-Developers original thread.

Click here to know How to Update Galaxy Star Pro S7262 with Android 4.1.2 XXUAMK5 Jelly Bean official firmware.
Read More..

Friday, August 15, 2014

Samsung galaxy ACE 3 and Galaxy s2 TV GUIDE Root CWM GT S7270 GT S7272 GT S7275 GT S7270L GT S7273T GT S7275R

In this guide i will tell you how to install ClockWorkMod recovery and root Samsung Galaxy Ace 3 and galaxy s2 tv

Go here for unrooting guide

First: downloads:
Samsung USB drivers.exe Updated to work with windows 8/8.1 If you cant install check this thread
Odin_v3.07.zip
Non-touch recovery.tar
Touch recovery.tar
Root.zip


Steps:
1 - Install Samsung USB drivers
2 - Extract Odin and run Odin3 v3.07.exe
3 - Select PDA button
4 - Choose the TAR file of type of recovery you prefer (Touch or non touch)
5 - Activate usb debugging, then power off the phone
6 - Go into download mode using this button combination "Home + Volume DOWN + Power"
7 - Select Volume UP to continue, Connect the phone via USB now.
8 - Press START in odin

--The phone will reboot now--You have installed CWM--
9 - Copy root.zip to you memory card / internal memory then turn off the phone
10 - Go to ClockWorkMod By using this button combination "home + Volume UP + Power"
11 - Select install zip from sdcard, select choose zip from sdcard, select root.zip
12 - Select reboot to system now

--Now your galaxy ace 3 is rooted with SuperSU Pro installed--
13 - Optional: Donate for me using the donate link up on the right :D
--Video Guide Here


For variants of Ace 3 that cant install clockworkmod, you can root without using it:
For rooting GT-S7270L , GT-S7275R , GT-S7273T .. etc.
First download and install this Chinese universal rooting program from Here
Then
1 - Turn on USB debugging in your Galaxy S3 minis settings
2 - Connect your phone


Wait


NOW YOU ARE SUPPOSED TO BE DONE

Check if superuser app is now installed on your phone.
Tell me your results.
If you want to install different superuser app and replace that Chinese app:

1-Download SuperUser by ChainsDD from HERE (playstore) or HERE (direct link, apk inside zip)

-OR download SuperSU by Chainfire from HERE (playstore) or HERE (direct link apk inside zip)

2-Install the preferred app (i recommend SuperSU as its faster)

3-If asked, update binary, so your new super user app become active

4-If not asked, update the binary manually:

-In SuperUser go to [Info] tab then update

-In SuperSu it should update automatically

5-Download Root uninstaller from HERE

6-Uninstall Chinese superuser app using root uninstaller


Read More..

Samsung Galaxy Ace 3 S7270 S7272 on Android 4 2 2 Jelly Bean Firmware Using Root Cwm Guide


Samsung has released the Android 4.2.2 Jelly Bean update with firmware build number S7270XXUAMH1 for the Galaxy Ace 3 with model number GT-S7270. The new official firmware is currently available as an Over-The-Air (OTA) update as well as through Samsung KIES.
Samsung Galaxy Ace 3 S7270/S7272 users who have already installed their devices with Android 4.2.2 Jelly Bean, may root their devices using the tutorial below.
Disclaimer: Rooting voids the warranty of your device. We and the developer of this rooting procedures shall not be held responsible if any undesirable outcomes may happen to your device. use of this root guide is solely at your own risk!
Pre-Requisites
1. Install USB Drivers for Samsung Galaxy Ace 3 on your computer.
2. Enable USB Debugging Mode on the device by navigating to Settings >> Developer Options.
3. Make a backup of all your important data before following the guide.
4. The Galaxy Ace 3 should be factory unlocked and not locked to any particular carrier.
5. Ensure the battery of the device is charged more than 80 percent.
6. The ClockworkMod Recovery (CWM) files works only on the Samsung Galaxy Ace 3 with model number GT-S7270 and GT-S7272 (Dual SIM). Applying these on any incorrect variant might brick the device. Verify the model number of the Galaxy Ace 3 by selecting Settings >> About Phone.
Files Required
1. CWM (Mirror Link) or CWM Touch (Mirror Link)
2. SuperSU (UPDATE-SuperSU-v1.51.zip) or the latest version
3. Odin 3.07 (Mirror Link)
Steps to Install CWM Recovery on Samsung Galaxy Ace 3
Step 1: Extract the Odin 3.07 file using WinRAR/7-Zip/WinZip or any other extracting tool.
Step 2: Copy the SuperSU file to the SD card of your phone.
Step 3: Switch off the Galaxy Ace 3. Then boot the device into Download Mode by pressing and holding Volume Down, Home and Power buttons together until a construction Android robot icon with a warning triangle appears on screen. Now press the Volume Up button to enter Download Mode.
Step 4: Run Odin on the computer as an Administrator.
Step 5: Connect the Galaxy Ace 3 to the computer using USB cable while it is in the Download Mode. Wait until Odin detects the device. When the device is connected successfully, the ID: COM box will turn to light blue with the COM port number. Additionally, the successful connected will be indicated by a message saying Added.

Note: If the Added message does not appear, then try re-install USB drivers or changing the port on the computer.

Step 6: In Odin, click the PDA button and select the CWM Recovery .tar file. Verify that Auto Reboot and F. Reset Time checkboxes are selected. Also, ensure the Re-Partition option is NOT selected.
Step 7: Double-check and click Start button in Odin. The installation process will now begin.
Step 8: Once the installation process is completed, your phone will restart and soon you will see a PASS message with green background in the left-most box at the very top of the Odin. You can now unplug the USB cable to disconnect it from the computer.

Steps to Root Galaxy Ace 3 by Installing SuperSU via CWM Recovery
Step 9: Reboot the device into CWM Recovery by pressing and holding Volume Up, Home and Power buttons together.
Step 10: In CWM Recovery, select "install zip from sdcard" and then select "choose zip from sdcard". Now, navigate to the SuperSU file that you copied earlier and confirm the installation by selecting Yes.
Step 11: Once installation process is completed, return to main recovery menu and select "reboot system now".

Samsung Galaxy Ace 3 S7270/7270 running on Android 4.2.2 Jelly Bean is now rooted successfully. You can now install any app that requires root permission. Verify the root status of the device by downloading Root Checker app from Google Play Store.

Thanks to all fellas at XDA who first tried out this rooting technique. This root method was originally posted via XDA-Developers original thread.
Read More..

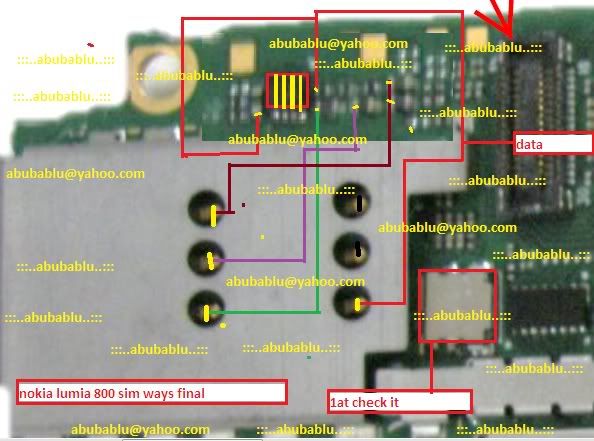
How To Working Nokia Lumia 800 Insert Sim Card Problem fix problem Guide

Nokia Mobile lumia 800 Insert sim card How to Fix problem,Nokia Mobile lumia 800 Sim Card Ways Jumper How to Fix problem,Lumia 800 Sim ic Jumper How to Fix problem,Lumia 800 sim Ways damage How to Fix problem,Lumia 800 Sim Ways Line Brokem How to Fix problem Jumper 100% Tested ,Nokia Mobile lumia 800 Sim Ways Print Missing How to Fix problem,How To Fix Your Lumia wp insert sim-No sim Problem Step By Step Guide Show On Diagram Picture.Work it Your own Risk maybe Tested For You

Lumia 800 Sim Ways Line Brokem How to Fix problem Jumper 100% Tested
Share This Post If You Tested & Dont Forget It To comment me :)
Read More..

Tuesday, August 12, 2014

Samsung Omnia I900 Hardware Repair Guide and Service manual

his is the service manual for Samsung Omnia I900  for hardware problem failures such as the following below:


Samsung Omnia I900 Power problem
Samsung Omnia I900 Receiver speaker problem
Samsung Omnia I900 Buzzer Speaker problem
Samsung Omnia I900 MIC problem
Samsung Omnia I900 Keypad problem
Samsung Omnia I900 Sim card problem
Samsung Omnia I900 memory card problem
Samsung Omnia I900 Bluetooth problem
Samsung Omnia I900 No Network problem

Download Samsung Omnia I900  Repair Guide
Read More..

Sunday, August 10, 2014

GUIDE Unlock bootloader flash recovery and root ALL IN ONE

Hi guys! Obvious with an official cm10.1 by team cyanogen we have also a recovery and possibility to flash root!
And here is a simple guide to flash it!

Pre-required:

  • Jelly bean
  • Driver lg installed correctly


Download:


Rom toolkit 1.3 - Added Cwm recovery 6.0.3.1
Rom toolkit 1.3.1 - Added option for download lg driver


Remember for unlock bootloader you must wait about 1 hour with jelly bean and phone on! dont reboot it!

Unlock bootloader and Flash recovery:
  • Connect phone to pc with debug mode and software lg on
  • Install Rom toolkit tool
  • Execute Rom toolkit
  • Press "Unlock bootloader" and your phone reboots into an LG mode and you must press vol up to unlock bootloader
  • Then press "Flash recovery" and program flash recovery - if phone reboot automatically the recovery is flashed, if no see if pc recognize phone when it is on fastboot mode
  • Hold vol up + home button and power button and release power button at vibration for boot into recovery!


Install root:
  • Reboot to recovery
  • Flash supersu zip
  • reboot!
Read More..

Saturday, August 9, 2014

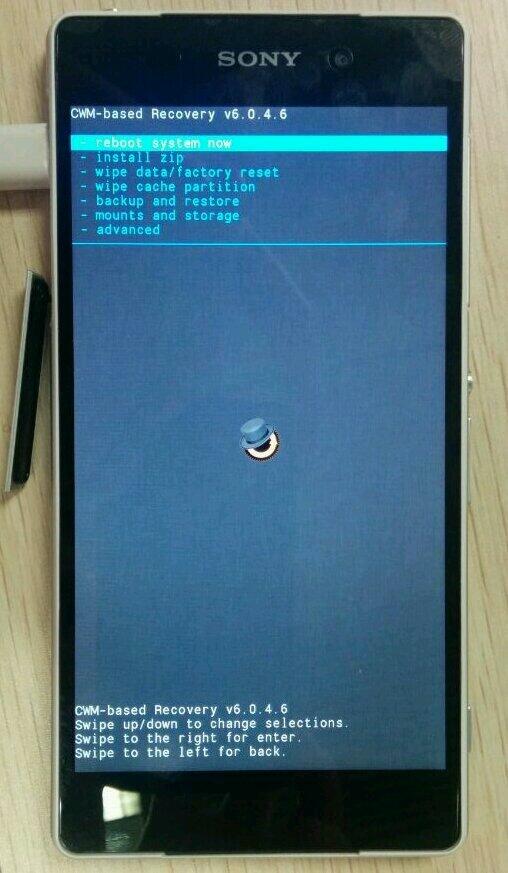
CWM Based Recovery 6 0 4 6 Touch Recovery for Xperia Z2 How To Guide

CWM-Based Recovery 6.0.4.6 Touch Recovery for Xperia Z2 How To Guide
info:This Recovery is built from CWM 6.0.4.6 sources!
I dont have this device with me and but would love to have one!...
all the testing was done remotely on users devices... thanks to @yeeson for testing on his Z2 !!!
[ PROOF ]CWM-Based Recovery 6.0.4.6 Touch Recovery for Xperia Z2 How To Guide
[ credits / special thanks ]
  • Koush - for the brilliant work & coding on CWM recovery
  • CyanogenMod and FreeXperia Team (especially jerpelea) for too many things *
  • special thanks to @yeeson for helping out with testing and risking his devices for the sake of development!!! and NO, his phone was NOT damaged during testing
  • ME for creating this for u guys!

[ Requirements ]

  • Bootloader unlocked
  • working fastboot
  • STOCK ROM FW:
    • 4.4.2
      • 17.1.A.2.36 - v01
    or ROMS BASED ON THAT FIRMWARE

[ features ]

  1. standard CWM recovery 6.0.4.6 - TOUCH RECOVERY!
  2. kernel is insecure (ro.secure=0)
  3. adb debugging is enabled by default in OS
  4. TIP: if u are experiencing very slow backup in CWM do this

[ WARNING ]
for flashing this kernel you WILL NEED TO UNLOCK BOOTLOADER! Check this thread for more info (same steps as Xperia Z1 are used for Xperia Z2)


UNLOCKING BOOTLOADER WITHOUT TA BACKUP WILL LEAD TO IRREVERSIBLE LOSS OF DRM KEYS!!!

AND YES CAMERA STILL WORKS AFTER UNLOCKING BOOTLOADER!!!
[ known issues ]

  1. adb is not working in recovery (can be fixed later)

[ how to flash this kernel ] (via fastboot)

  1. download the kernel image
  2. save the boot.img to the folder containing fastboot binary
  3. flash the boot.img using fastboot:
    Code:
    fastboot flash boot boot.img
    reboot from fastboot Code:
    fastboot reboot
  4. the device should now start booting
  5. enjoy!
[ how to enter recovery ]

when you see the Sony logo and the LED light turns pink/amber/orange keep tapping/pressing VOLUME UP key
[ how to Root ]

for instructions on how to root please check this post
[ sources ]
https://github.com/DooMLoRD/android_device_sony_honami

for now recovery is same is same as honami

[ donations ]

Please do consider donating as I plan to get this device!

if u feel that this work has helped u OR u think that the work i put into making this is worthy of donations, then click on the following link for buying me some coffee/beer/etc

PAYPAL DONATION LINK

OR
you can buy one of my awesome apps from Play Store!

[ download links ]
PLEASE DO NOT MIRROR, REDISTRIBUTE, REPACK MY FILES
NEW:

Advance Stock Kernel with Recovery v01 (FW:17.1.A.2.36}
MD5HASH: 6e0c418d299780bd0ac74e69ff46a199
    Read More..

    Root Samsung Galaxy S4 I9500 on Android 4 2 2 Jelly Bean Cofface CWM Recovery Install Guide Included

    Galaxy S4 I9500 has been launched and now you can learn how to successfully root its stock Android 4.2.2 Jelly Bean firmware using this guide.  Read this entire post and you should be able to apply all changes successfully without bricking the device.
    This is a guide for advanced Android users and you shouldn’t attempt to use in case you don’t know what you’re doing. Rooting your device should be easy in theory, but if you don’t know what a custom Recovery is and how to use ODIN, then it would be best not to try to apply any changes to your phone.
    Rooting your device is easy and after applying these changes you will be able to flash new custom ROMs and other customization files that will enhance your overall experience of Jelly Bean operating system for your Galaxy S4. In order to successfully flash all the required files you should first read the guidelines below:
    • use this guide only with the Samsung Galaxy S4 model number I9500. This is the Exynos 5 Octa variant. Don’t try to root any other Android device with this tutorial, as you will end up bricking it.
    • this guide shouldn’t wipe any files from your device, but you should still create backups of some of your most important files.
    • it has to be running the stock Android 4.2.2 Jelly Bean firmware.
    • before rooting the phone you will need to flash the CWM Recovery by Cofface. Without this you cannot root the phone.
    • enable USB Debugging from the Android Developer Options menu. In case the Developer Options menu is not shown in Settings, you will have to open the ‘About device’ menu and tap 7 times on the ‘Build Number’ section, as that will enable the development options for your Galaxy S4.
    • make sure that you have the Samsung USB drivers installed on your PC, as without these you cannot connect the phone with your PC. If your PC doesn’t have them installed, then you can try to download them from here.
    • disable the Samsung KIES software from running on your PC before starting the installation.
    • disable all running antivirus applications.
    • make sure that there is enough battery power left, so that your phone won’t switch off in the middle of the updating process.
    • use this tutorial only if you’re an advanced Android user.
    • don’t blame us in case you brick your phone or you lose any important data in the process.
    These were all the preparation tips you had to go over before getting to the tutorial. If you cannot complete the root, then you should ask for extra help in comments.
    Now, you’ll learn how to flash the CWM Recovery image first. After you install this custom recovery on your phone, move on to the next part of this post to learn how to root the smartphone.
    This custom Recovery by Cofface contains both the recovery image and the Root file for your device. It is based on ClockworkMod – CWM Recovery and you should be able to complete the tutorial in under 5 minutes with success.

    How to flash Cofface’s CWM Recovery for Samsung Galaxy S4 I9500 with ODIN:

    1. Download the Cofface CWM Recovery and Root file from HERE. Save the file on your PC.
    2. Extract the contents of the zip, put them in a folder and place it on your computer’s desktop screen.
    3. Download Odin 3.07 from HERE. Save it on PC and extract the contents to a single folder.
    4. Power off your Samsung Galaxy S4 I9500 device completely.
    5. Boot it into Download Mode like this:
      > Plug the USB cable into PC.
      > Press and hold Volume Up and Volume Down buttons. Don’t release them.
      > While your keeping the buttons pressed, plug in the USB data cable to your phone.
      > Release the buttons when the Download Mode loads and you see a yellow triangle screen.
    6. Next, launch the ODIN 3.07 executable on your computer.
    7. ODIN will detect the phone and it confirm this by displaying the ‘Added!!’ message. Get to the next step now. NOTE: If the ‘added!!’ message doesn’t show up, then you will have to try and change the USB ports on your PC or re-install the Samsung USB drivers, which means that you will have to restart the tutorial from step 1.
    8. Click the ‘PDA’ ODIN button now.
    9. Browse your PC for the “cofface_samsungI9500_recovery_en_0503.tar” file, the one extracted in step 2. Load it into ODIN. Don’t change any default settings and make sure that the ‘Re-partition’ option is disabled.
    10. Press START when you’re ready to flash the new custom Recovery for your Galaxy S4.
    11. After the Cofface CWM Recovery image is installed the smartphone will restart.
    12. Disconnect the phone from PC when you see the Samsung Galaxy S4 boot animation.
    13. Wait for it to boot into normal mode and after that Power it off completely.
    Now you’ll learn how to use Cofface CWM Recovery to apply root for your phone.

    How to Root the Samsung Galaxy S4 using Cofface’s CWM Recovery:

    1. Since your device is powered off, you can boot into CWM Recovery mode like this: press and hold Volume Up, Home and Power buttons simultaneously.
    2. Release the buttons when the CWM Recovery mode appears and don’t select any options.
    3. Select the ‘root your phone’ option.
    4. You will now see two methods that you can choose from. Select any of them and wait for the CWM Recovery image to be installed.
    5. Return to the first screen of CWM Recovery mode when you’re told that the installation has been completed.
    6. Select ‘reboot system now’ and wait until the device powers into normal mode.
    7. Now, since the phone has loaded the Android 4.2.2 Jelly Bean home screen, open the App Drawer.
    8. Check to see if the SuperUser app is listed. If it is, the root has been completed successfully and you’re done with this tutorial.
    IMPORTANT NOTE: Don’t update the SuperUser / SU binaries after applying root.
    These were all the steps that you had to take in order to apply root for your Samsung Galaxy S4 model number I9500. In case you cannot complete the tutorials, then you should ask for more help in comments. Make sure to leave a detailed comment telling us exactly which steps you took and where you got stuck while trying to apply root.
    Now that your Samsung Galaxy S4 is rooted, you can start searching for custom ROMs such as CyanogenMod, Paranoid Android, AOKP or any other titles based on these.
    Read More..